Quantcast
Channel: Windows 365 & Intune Management
Viewing all 144 articles
Browse latest View live

Advanced Installer 13.3 - fixes MSI launch condition issue in Windows 10 anniversary update 1607

$
0
0
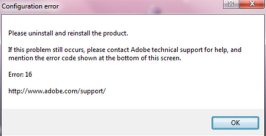
Earlier when trying to install the Advanced Installer created virtual package through MSI format in windows 10 anniversary update 1607, it failed to install with the below error.


This issue is caused because of a launch condition in MSI which has been set to check for App-V client installed as a pre-requisite. Since App-V comes inbox with windows 10 v1607, the pre-req check fails with the above error.

This was a known issue even with App-V created packages and it was reported back to Microsoft.

Meantime I had a chance to talk with the Advanced Installer team about this issue. They quickly reported that they will look into this issue ASAP and come back with a fix. To my wonder they released an update within a short time period. You can have a look on their release note about this bug fix.

http://www.advancedinstaller.com/release-13.3.html

Now using Advanced Installer 13.3 when you create a virtual package and use the MSI to install in windows 10 1607, it installs fine without any issue. I tested with few apps sequenced by Advanced Installer 13.3 and found it to be 100% success.


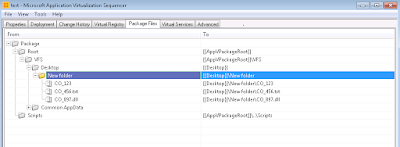
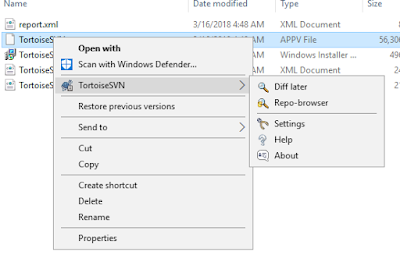
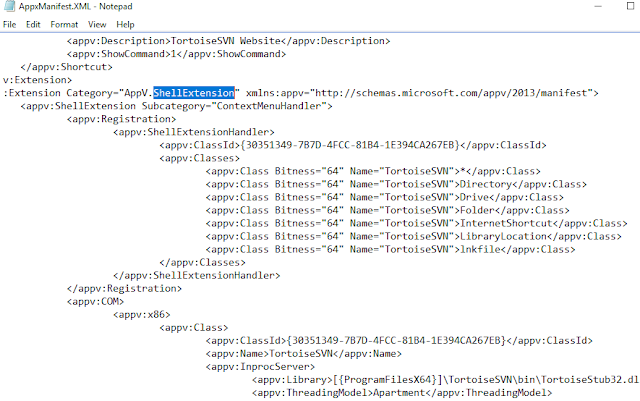
So I looked into the MSI created after virtualizing and saw that it had the same launch condition but with a different approach. They have used the APPV_5X_CLIENT_INSTALLED property which has been set using AppSearch.


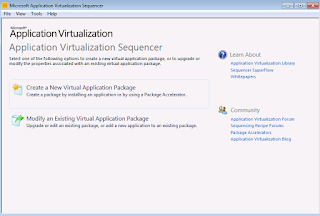
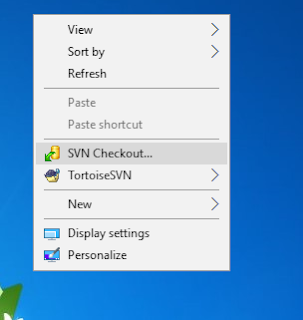
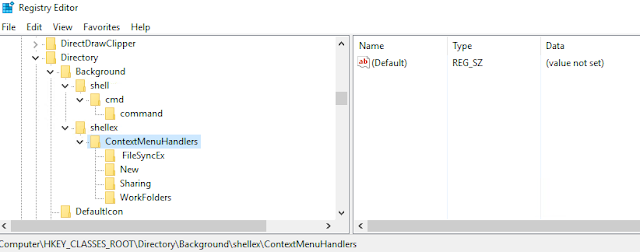
In this case they have used to locate the registry existence (HKLM\Software\Microsoft\AppV\Client).


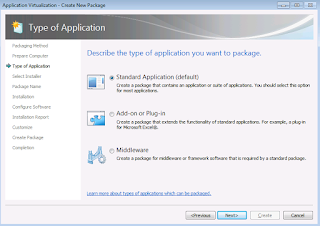
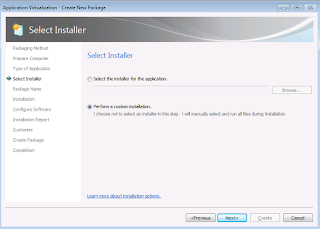
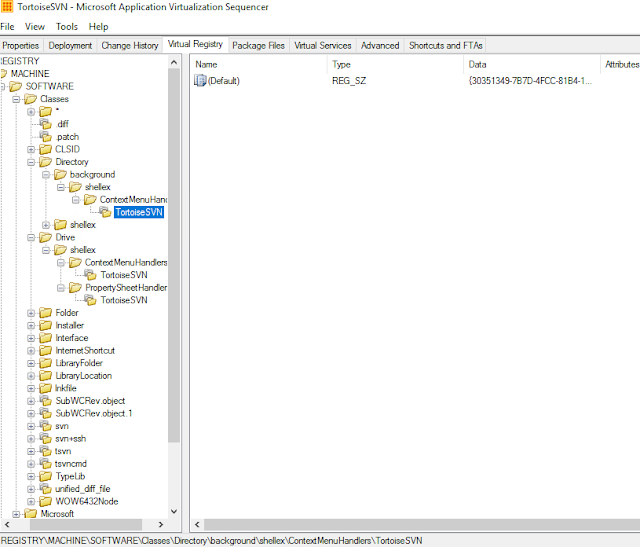
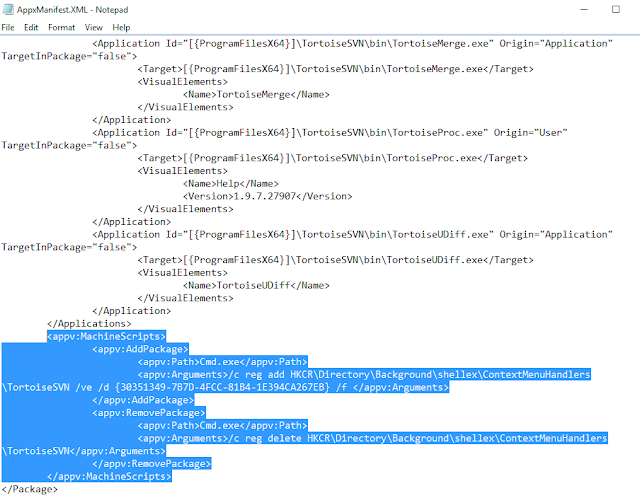
Since windows 10 has inbuilt App-V, it  has a registry for AppV with version 5.2.0.0 by default.


Now when you install the new Advanced Installer 13.3 created virtual package MSI, the launch condition gets satisfied as there is a registry key with a valid  version and so it gets installed successfully.


For earlier versions, it still fails. For now you can fix it using the below solutions.


Solution - Virtual applications packaged into MSI format doesn’t install on inbox App-V client in Windows 10 Anniversary update 1607


UPDATED LINK -https://technet.microsoft.com/en-us/itpro/windows/manage/appv-release-notes-for-appv-for-windows


Right-Click and Publish AppV packages using ContextMenu Shortcut - A simple registry hack

$
0
0
I always wanted a simple trick to install the App-V virtual packages in a single click without any need to open powershell and type commands in a standalone machine. I have worked on many software's and  used to see some of them provide context menu shortcut (notepad++, winzip etc..) So I had an idea to create a simple registry tweak to publish the virtual packages either globally or to a user by just right clicking a .appv file using context menu option.

Copy the below code and save it in a notepad with .reg extension. Double click and register it.


Windows Registry Editor Version 5.00

[HKEY_CLASSES_ROOT\.appv]
@="appvex"

[HKEY_CLASSES_ROOT\appvex]

[HKEY_CLASSES_ROOT\appvex\shell]

[HKEY_CLASSES_ROOT\appvex\shell\Publish Globally]
@="&Publish Globally"

[HKEY_CLASSES_ROOT\appvex\shell\Publish Globally\command]
@="cmd /c start /b /wait powershell.exe -nologo -ExecutionPolicy bypass -command \"& {add-appvclientpackage '%1' |publish-appvclientpackage -global|mount-appvclientpackage}\""

[HKEY_CLASSES_ROOT\appvex\shell\Publish to User]
@="Publish to &User"

[HKEY_CLASSES_ROOT\appvex\shell\Publish to User\command]
@="cmd /c start /b /wait powershell.exe -nologo -ExecutionPolicy bypass -command \"& {add-appvclientpackage '%1' |publish-appvclientpackage |mount-appvclientpackage}\""


After registering the registry key, now you should be able to see the below highlighted context menu shortcut when you right-click any .appv file. To publish globally, click on the Publish Globally shortcut and vice versa.


Registry Peak:


Note: This doesn't add the dynamic configuration file while adding/publishing. I will post it separately in my next blog.


Disclaimer - Test it with caution as I don't hold any responsibility for any problem caused. This is issued for experimental purpose only.

Merry Christmas and a Happy New Year!!

If you would like to try on your own refer to the below link which can guide you.

Reference - http://www.howtogeek.com/107965/how-to-add-any-application-shortcut-to-windows-explorers-context-menu/


Right Click and Publish App-V Package along with Dynamic Configuration File - Context Menu Shortcut

$
0
0

In my previous blog I had posted about a simple registry tweak to publish packages globally/User by just right clicking and selecting the option. But in that method, it will not use the dynamic configuration file. And so I have covered how to do that in this blog.


copy the below code in notepad and save it in .reg format. After saving, double click on it and register the keys.


Windows Registry Editor Version 5.00

[HKEY_CLASSES_ROOT\.appv]
@="appvex"

[HKEY_CLASSES_ROOT\appvex]

[HKEY_CLASSES_ROOT\appvex\shell]

[HKEY_CLASSES_ROOT\appvex\shell\Publish Globally]
@="&Publish Globally"

[HKEY_CLASSES_ROOT\appvex\shell\Publish Globally\command]
@="cmd /c start /b /wait powershell.exe -nologo -ExecutionPolicy bypass -file \"c:\\Publish globally.ps1\" \"%1\""

[HKEY_CLASSES_ROOT\appvex\shell\Publish to User]
@="Publish to &User"

[HKEY_CLASSES_ROOT\appvex\shell\Publish to User\command]
@="cmd /c start /b /wait powershell.exe -nologo -ExecutionPolicy bypass -file \"c:\\Publish to user.ps1\" \"%1\""


Publish Globally:


Copy the below code in a notepad and save it as Publish globally.ps1. Place this file in C:\ drive. If you are planning to keep it elsewhere, then edit the registry entry accordingly.


#Import App-V Client Module
Import-Module AppvClient

#Enable execution of scripts
Set-AppvClientConfiguration -EnablePackageScripts 1


#get appvfile

$appvfile = "$args"

Write-Host$appvfile

#get appv file location

$appvlocation = $appvfile.lastindexof("\")

$location = $appvfile.substring(0,$appvlocation)

Write-Host$location

Write-Host"Path is valid = $(Test-Path $location)"

Set-Location$location

#get _Deploymentconfig file

ForEach ($filein"$location")

{
$Name=Get-ChildItem$file
for ($i = 0;$i-lt$Name.count;$i++)
{

if ($Name[$i].Extension -eq".xml")
{
$xmlFileName = $Name[$i].FullName
if ($xmlFileName.contains("_DeploymentConfig"))
{
$deploymentconfigfile = $xmlFileName
Write-Host"$deploymentconfigfile"

}


}

}


Add-AppvClientPackage -path $appvfile -DynamicDeploymentConfiguration "$deploymentconfigfile" | Publish-AppvClientPackage -Global | Mount-AppvClientPackage

}


Publish to User:

Copy the below code in a notepad and save it as Publish to user.ps1. Place this file in C:\ drive. If you are planning to keep it elsewhere, then edit the registry entry accordingly.


#Import App-V Client Module
Import-Module AppvClient

#Enable execution of scripts
Set-AppvClientConfiguration -EnablePackageScripts 1


#get appvfile

$appvfile = "$args"

Write-Host$appvfile

#get appv file location

$appvlocation = $appvfile.lastindexof("\")

$location = $appvfile.substring(0,$appvlocation)

Write-Host$location

Write-Host"Path is valid = $(Test-Path $location)"

Set-Location$location

#get _userconfig file

ForEach ($filein"$location")

{
$Name=Get-ChildItem$file
for ($i = 0;$i-lt$Name.count;$i++)
{

if ($Name[$i].Extension -eq".xml")
{
$xmlFileName = $Name[$i].FullName
if ($xmlFileName.contains("_UserConfig"))
{
$UserConfigfile = $xmlFileName
Write-Host"$UserConfigfile"

}


}

}


Add-AppvClientPackage -path $appvfile | Publish-AppvClientPackage -DynamicUserConfigurationPath "$UserConfigfile"| Mount-AppvClientPackage

}


Context Menu Preview:


When you right click any .appv file, it will show the below two context menu shortcuts.If you want to publish globally along with the deploymentconfig file then click on Publish Globally and to publish to a user along with the Userconfig file then click on Publish to User.


The case of missing shortcut Icon - App-V 5.X

$
0
0
Recently I have been seeing many queries regarding shortcut Icon not displayed after publishing an virtualized App-V 5.x package. The answer would be quite simple. But I would like to demonstrate it with a simple example so that it can shed some light.


Let us assume a person X has sequenced an application say example Adobe Reader application. He is doing some manual clean up in the package editor. He removed some junk entries to keep the package clean. He also removed the Installer folder that has the installer cache (.msi, .mst, .msp)captured from the installer package as he felt it is also unnecessary junk entries like all others do.


After completing sequencing, he published the package to the machine in a standalone environment and saw that the shortcut icon is missing. He was wondering why the Icon is missing. He came back with a query as why the Icon is missing even after successful sequencing.


Now lets troubleshoot for him. First let's edit the shortcut for icon. We can see that it is looking in %ALLUSERSPROFILE%\Microsoft\AppV\Client\Integration\.....\SC_Reader.ico.


Lets take Procmon capture to get a proper solution. We can see that it is searching for SC_Reader.ico in  the Installer location and the path is not found clearly from procmon trace. When checked manually in the %Allusersprofile% we do see that the Installer folder is missing. This is because the person X has removed it from the package considering it as Junk entries earlier.


We can clearly see that after doing a fresh sequencing of the application that the Icon files are indeed kept in the Windows\Installer folder.


So to conclude do not remove files and folders blindly considering it as junk entries. Do not remove Windows\Installer completely. Perform cleanup with caution. Make sure if removing the Installer folder completely will not affect the functionality.

Remove all unpublished apps to clear package cache

$
0
0
Often I see queries related to clearing leftover package files after unpublishing them. And so here is a sample powershell code to remove all unpublished packages from the system to clear the space they were occupying in the package store.


$allpackages= Get-AppvClientPackage -all|Where-Object {$_.IsPublishedToUser -like"False"-and$_.IsPublishedGlobally -like"False"} | select Name

$unpublished=$allpackages.name

ForEach($packagein$unpublished)

{

Write-Host"$package"

Remove-AppvClientPackage"$package"

Write-Host"$package" removed.

}

NOTE: Test the code in a lab environment, as it doesn't support any error handling.

Windows 10 v1703 - Auto App-V unpublished package clean up

$
0
0
Earlier when we unpublish App-V packages it used to stay in the App-V cache location  and used to occupy unwanted storage space on the client machines. If we want to remove them to free up space we need to  do manual removal or using powershell command Remove-AppVClientpackage

With the release of the new windows 10 creators update v1703 App-V client provides options to automatically cleanup the unpublished packages.It requires restart.

This option can be enabled either by PowerShell or group policy or Registry.

PowerShell:


Open PowerShell as administrator and run the below code.

Set-AppvClientConfiguration -AutoCleanupEnabled 1


Run the below code to get the status.

Get-AppvClientConfiguration


Group Policy:

Go to Administrative Templates-System-App-V-PackageManagement-Enable automatic cleanup of unused appv packages and select enabled.

Registry:

HKLM\SOFTWARE\Microsoft\AppV\Client\PackageManagement
AutoCleanupEnabled 
REG_DWORD 1

Finally Microsoft have provided the much awaited feature to its users.

App-V Sequencer 5.X cannot sequence apps with filenames "CO_x". But it is possible !!

$
0
0
Recently I came across the App-V technical document stating that 

"The App-V 5.x Sequencer cannot sequence applications with filenames matching "CO_<x>" where x is any numeral. Error 0x8007139F will be generated."

https://docs.microsoft.com/en-us/microsoft-desktop-optimization-pack/appv-v5/creating-and-managing-app-v-51-virtualized-applications


https://github.com/Microsoft/windows-itpro-docs/blob/master/windows/application-management/app-v/appv-release-notes-for-appv-for-windows.md


So I ran a quick test to confirm on the same.I used App-V 5.1 sequencer and App-V 5.1.86 client for testing.

During monitoring phase, I created a New folder in desktop for convenience.I then created 3 new files with different extensions (CO_123, CO_456.txt, CO_897.dll) and then proceeded stopping the monitoring phase. I was expecting that sequencer will throw an error or fail as mentioned in the Microsoft technical document. To my surprise sequencer completed without any issues. I was able to see the files in Package Files tab in the sequencer package editor.


To confirm, I also published the test package in a standalone machine and saw those files getting reflected.

So to finalize, App-V 5.1 Sequencer can (not 100%) sequence apps with filenames having "CO_<x>" without any issues. This is just a experimental test scenario and if anyone have faced the issue having CO_<x> in their package while sequencing, kindly comment below about the application. I will be happy to validate it further and update this blog post.

Solution: COM Addin failure with Locally installed MS Office 2016 c2r

$
0
0
These days I see many queries in Microsoft technet forum related to COM Addin's not getting loaded into locally installed MS Office 2016 c2r version. So to help others, I have listed the possible solutions which I have gathered from my experience and from other blog posts in a single article below.

ISSUE:

1. Sequence Microsoft Office 2016 addin's using App-V 5.1 Sequencer
2. Publish the sequenced addin's package in the client side which has App-V 5.1 client and  Microsoft Office 2016 c2r locally installed
3. Launch the Microsoft Office 2016 c2r Word/Excel using /appvve: or RunVirtual registry key to load them into the  published addin's virtual environment to test the addin's.
4. we see that the addin is not loaded.

You can find a similar possible reason for failure in the below link.
https://support.microsoft.com/en-us/help/3159732/click-to-join-fails-to-invoke-skype-for-business-on-computers-that-us

"The ProcessesUsingVirtualComponents registry value specifies a list of process paths that are candidates for using dynamic virtualization (supported shell extensions, browser helper objects, and ActiveX controls). Only processes whose full path matches one of these items can use dynamic virtualization.

By default, Explorer.exe and Internet Explorer are listed there. Therefore, when the iexplore.exe process runs, it has the APPVEntsubsystem32.dllloaded in Internet Explorer. When Office C2R detects that APPVEntsubsystem32.dll is loaded into Internet Explorer, it does not load jitv.dll or APPVISVSubsystem32.dll into Internet Explorer. As a result, there is no registry redirection support.

When the JavaScript that's running in Internet Explorer tries to create any ActiveX objects that are part of the Office C2R package, that operation fails and the Office C2R and SharePoint integration are broken. Office C2R and App-V dynamic virtualization aren’t designed to co-exist; therefore, Office C2R disables Dynamic Virtualization when it detects that AppV client binaries are loaded in Internet Explorer to prevent double hooking."


Solution 1:

Create the AllowJitvInAppvVirtualizedProcess registry key as shown below to fix this known issue.


Windows Registry Editor Version 5.00

[HKEY_LOCAL_MACHINE\SOFTWARE\Microsoft\ClickToRun\OverRide]
"AllowJitvInAppvVirtualizedProcess"=dword:00000001

If it doesn't work try in wow6432Node registry.


Windows Registry Editor Version 5.00

[HKEY_LOCAL_MACHINE\SOFTWARE\Wow6432Node\Microsoft\ClickToRun\OverRide]
"AllowJitvInAppvVirtualizedProcess"=dword:00000001


Solution 2:

If Solution 1 doesn't work , try with the latest App-V 5.1 Hot Fix. Always make sure to use the latest App-V 5.1 Hot Fix. (A minimum of Hot Fix 4 is required for this issue to be resolved.)

You can download the latest Hot Fix here: KB4018510

Solution 3: 

If Solution 1 & Solution 2 doesn't work then open the sequenced package using App-V 5.1 sequencer and expand it to local from the tool menu.

https://blogs.technet.microsoft.com/gladiatormsft/2013/10/25/appv-on-devirtualization/

Once it is de-virtualized, check whether the addin works. If it doesn't work then there is some file/registry missing.In this case, procmon or spystudio can help in troubleshooting.

Solution 4: ( Credits: Roy Essers)

If running on 64-bit windows then export the full hive HKEY_LOCAL_MACHINE\SOFTWARE\Microsoft\Office\ClickToRun\REGISTRY, and import it into HKEY_LOCAL_MACHINE\SOFTWARE\WOW6432Node\Microsoft\Office\ClickToRun\REGISTRY.

NOTE: This must be done every time office updates.

I believe mostly Solution 1 & Solution 2 will fix the issue if the package has been properly sequenced.

Related Articles:

http://packageology.com/2016/08/office-365-app-v/
http://www.applepie.se/tag/allowjitvinappvvirtualizedprocess

Sequence SPARX Enterprise Architect 13.5 - AppV 5.1

$
0
0
Select create a new virtual package.


Select create package.


Select standard package.


Select custom installation.


Type the name of the virtual package as Sparx Enterprise Architect 13.5.


Click Next and Install the application.


Remove the desktop shortcut. Select I am finished Installing.


If you need to do any post install configuration like adding new registration key,Launch the shortcut “Enterprise Architect” and do it here.Once done click Next.


Click Next and save the Package.


Publish and test the sequenced package in  the latest windows 10 environment.

Adobe Acrobat error 16 & UAC - App-V 5.1

$
0
0


After converting Adobe Acrobat standard 10.0 application from App-V 4.6 to App-V 5.1 using powershell commands, it throws an error 16 when launching the shortcut.


Reason:
This is due to UAC and the application requires to be run as administrator.

Solution: To test manually Click Start > All Programs. Right click on the Adobe Acrobat X Standard product and click Run As Administrator.The shortcut will launch without any error.

So how to resolve this in the App-V 5.1 package? We need to suppress the UAC prompt when run as administrator.

Check my another blog for more information to solve this issue here

Mozilla Firefox Virtual package and Local office 0365 failure

$
0
0
After publishing Mozilla Firefox App-V package in windows 7, logging into portal.office.com and opening a word or excel document and trying to edit it with locally installed Office 0365 fails. When checked with procmon, we can see that Mozilla Firefox virtual package is able to see the local o365 package and tries to open it but the winword.exe process closes soon with exit code 1.


Solution 1:

Create the AllowJitvInAppvVirtualizedProcess registry key as shown below to fix this known issue.


Windows Registry Editor Version 5.00

[HKEY_LOCAL_MACHINE\SOFTWARE\Microsoft\ClickToRun\OverRide]
"AllowJitvInAppvVirtualizedProcess"=dword:00000001

If it doesn't work try in wow6432Node registry.


Windows Registry Editor Version 5.00

[HKEY_LOCAL_MACHINE\SOFTWARE\Wow6432Node\Microsoft\ClickToRun\OverRide]
"AllowJitvInAppvVirtualizedProcess"=dword:00000001


Solution 2:

If Solution 1 doesn't work , try with the latest App-V 5.1 Hot Fix. Always make sure to use the latest App-V 5.1 Hot Fix. (A minimum of Hot Fix 4 is required for this issue to be resolved.)

You can download the latest Hot Fix here: KB4018510

Tested the same scenario in Windows 10 1607, only the AllowJitvInAppvVirtualizedProcess registry key is required.

NOTE: Fixes that are delivered to the “out-of-box” versions of App-V and UE-V are first delivered for the “in-box” versions of App-V and UE-V in the monthly Windows 10 cumulative updates.Since updates are provided to windows 10 in-box App-V client first, it will not require the installation of the latest Hot-Fix.

From Windows 10 1703, this AllowJitvInAppvVirtualizedProcess registry key will be automatically added when any of the Office product starts.

Virtual Google Chrome and Local o365 issues - Solution

$
0
0
After publishing Google Chrome App-V package in windows 7, logging into portal.office.com and opening a word or excel document and trying to edit it with locally installed Office 0365 fails. When checked with procmon, we can see that Google Chrome virtual package is able to see the local o365 package and tries to open it but the winword.exe process closes soon with exit code 1.


As in last blog,  I have detailed about the same issue happening with Appv-d Mozilla Firefox package and local o365.The solutions are still the same for the current scenario too. 

Solution 1:

Create the AllowJitvInAppvVirtualizedProcess registry key as shown below to fix this known issue.


Windows Registry Editor Version 5.00

[HKEY_LOCAL_MACHINE\SOFTWARE\Microsoft\ClickToRun\OverRide]
"AllowJitvInAppvVirtualizedProcess"=dword:00000001

If it doesn't work try in wow6432Node registry.


Windows Registry Editor Version 5.00

[HKEY_LOCAL_MACHINE\SOFTWARE\Wow6432Node\Microsoft\ClickToRun\OverRide]
"AllowJitvInAppvVirtualizedProcess"=dword:00000001


Solution 2:

If Solution 1 doesn't work , try with the latest App-V 5.1 Hot Fix. Always make sure to use the latest App-V 5.1 Hot Fix. (A minimum of Hot Fix 4 is required for this issue to be resolved.)

You can download the latest Hot Fix here: KB4018510

Tested the same scenario in Windows 10 1607, only the AllowJitvInAppvVirtualizedProcess registry key is required.

NOTE: Fixes that are delivered to the “out-of-box” versions of App-V and UE-V are first delivered for the “in-box” versions of App-V and UE-V in the monthly Windows 10 cumulative updates.Since updates are provided to windows 10 in-box App-V client first, it will not require the installation of the latest Hot-Fix.

From Windows 10 1703, this AllowJitvInAppvVirtualizedProcess registry key will be automatically added when any of the Office product starts.

App-V: Virtual Packages works in win 10 1607 but fails in windows 10 1703/1709

$
0
0
Many packages that completely worked in inbox App-V in windows 10 1607 failed after upgrading to windows 10 1703 and 1709 versions. The reason for failure is due to Microsoft changed the way to load registries in containers CREG instead of usual virtual registry VREG. To know about this change do have a look at the below articles from Tim Mangan.

http://www.tmurgent.com/TmBlog/?p=2692
http://www.tmurgent.com/TmBlog/?p=2733

There was a temporary fix which was available and Roy Essers posted it in twitter a long back.
It was adding the below registry entry manually in the 1703/1709 machines.


[HKEY_LOCAL_MACHINE\SOFTWARE\Microsoft\AppV\Client\Compatibility]
"RegistryCompatibilityMode"=dword:00000001


Microsoft has released an update earlier today which is supposed to fix this registry mapping issue.
https://support.microsoft.com/en-us/help/4074588


We can clearly see that they have made use of the temporary fix to change the registry virtualization to use the VREG instead of the modern CREG that was mentioned earlier to permanently fix this issue.


Apart from the registry fix, this update also fixes many other App-V issues which can bee seen below.


This update will be downloaded and installed automatically from Windows Update. If you would like to use the standalone package for this update, download it from the below link.


http://www.catalog.update.microsoft.com/Search.aspx?q=KB4074588

NOTE: This fix is supposed to be only for windows 10 1709. The article haven't mentioned anything about windows 10 1703. Will do a check in windows 10 1703/1709 and update how the fix has really helped to solve the issue.

Solution for Error 17002 when uninstalling Office 365 (2016) when apps like word, excel, outlook are open

$
0
0
When uninstalling office 365 silently, it is failing only when any applications like word, excel are kept open. This is because during uninstall, office checks for any running applications and prompts the user to close it which is not happening in silent uninstall.


When uninstalling in UI mode, it prompts to close when any office apps are open. Since in silent mode office is not able to do this, it fails with an error code 17002.


You can check in the log file for the error code 17002.


To overcome this just add the property FORCEAPPSHUTDOWN with Value="True" in the uninstall config.xml file. This property will force shutdown any running office apps.


Example:


<Configuration>
 <Remove>
 <Product ID="O365ProPlusRetail">
 <Language ID="en-us" />
  </Product>
 </Remove>
<Property Name="FORCEAPPSHUTDOWN" Value="TRUE" />
<Display Level="None"/>
<Logging Path="c:\temp\" Name="Uninstall.log"/>
</Configuration>


NOTE:


Place  the  <Property Name="FORCEAPPSHUTDOWN" Value="True" /> part after  the <Remove>... </Remove> tags. If it is placed in between <Remove>... </Remove> tags, then it wont work.


You can use the below online configuration xml editor to avoid issues when editing the XML file.


http://officedev.github.io/Office-IT-Pro-Deployment-Scripts/XmlEditor.html

HotFix Released: App-V Applications worked in win 10 1607 fails in win 10 1703

$
0
0
Many packages that completely worked in inbox App-V in windows 10 1607 failed after upgrading to windows 10 1703. The reason for failure is due to Microsoft changed the way to load registries in containers CREG instead of usual virtual registry VREG.

There was a temporary fix which was available and Roy Essers posted it in twitter a long back.
It was adding the below registry entry manually in the 1703/1709 machines.


[HKEY_LOCAL_MACHINE\SOFTWARE\Microsoft\AppV\Client\Compatibility]
"RegistryCompatibilityMode"=dword:00000001


This issue is fixed in windows 10 1703 with the new hotfix released.


https://support.microsoft.com/en-us/help/4077528


We can clearly see that they have made use of the temporary fix to change the registry virtualization to use the VREG instead of the modern CREG that was mentioned earlier to permanently fix this issue.


Apart from the registry fix, this update also fixes many other App-V issues which can bee seen below.


This update will be downloaded and installed automatically from Windows Update.


Adobe Illustrator error 16 - Fix

$
0
0
When launching sequenced Adobe illustrator shortcut we see the below issue in the App-V client machine.


Reason: This is due to UAC and the application requires to be run as administrator.

Solution: To test manually Click Start > All Programs. Right click on the Adobe Illustrator shortcut  and click Run As Administrator. The shortcut will launch without any error.

So how to resolve this in the App-V 5.x package? We need to suppress the UAC prompt when run as administrator using RunAsInvoker or other shims.

Check my another blog for more information to solve this issue here

Solution: TortoiseSVN Background contextmenu not visible after publishing

$
0
0
After publishing the App-V sequenced TortoiseSVN, all the context menu shortcuts are visible and it works fine. Only the background context menu option is not visible. In this blog, I will demonstrate and provide a solution for it.


First download the TortoiseSVN software from the below link.
https://tortoisesvn.net/downloads.html


Download the Latest windows ADK so that we can use the latest App-V Sequencer from the below link.
https://docs.microsoft.com/en-us/windows-hardware/get-started/adk-install


Sequence the TortoiseSVN application using default steps.


Even if you use PVAD when sequencing, we can see the same issue that the background context menu is not visible after publishing.
After Publishing the sequenced package, we can see that when we right click file\folder\drive the context menu option is visible as App-V will install those respective registry entries in the local machine and they will be used by the explorer due to dynamic virtualization concept.


FILE:


FOLDER:


But when we right click on empty explorer window or inside any folder empty place, the below options are not visible as seen in the native installed package.


We can see that in the sequencer machine, the following registry responsible for the background context menu is registered in the local machine.


Even in the package editor we can see that those registry keys are captured.


Even in the AppxManifest file we can see those shell entries.


But after publishing and seeing the local HKCR registry, the particular key alone is missing. All other context menu registries are visible.


Windows Registry Editor Version 5.00

[HKEY_CLASSES_ROOT\Directory\Background\shellex\ContextMenuHandlers\TortoiseSVN]
@="{30351349-7B7D-4FCC-81B4-1E394CA267EB}"


To Fix the issue, copy the above registry key and install in native machine.To Add it with the sequenced package, first export the AppxManifest.xml file and edit it using AVME from the below link.


Edit the XML file and add like below in AddPackage and Remove Package tabs.


Once done save the AppxManifest.xml file and import it back to the package using sequencer.


Save the package and publish it to the client machine. Now you can see the context menu when you click on empty explorer window or empty space inside directory.
You can also add the registry using scripts in deploymentconfig/userconfig file too.

As pointed by Roy Essers in a TechNet post, this indeed seems to be App-V sequencer bug and MS needs to fix this soon.

Exploring Advanced Installer Express free edition to convert legacy apps to UWP

$
0
0
Earlier back in 2016 when Microsoft released Project centennail, I have blogged about it which you can find here

To know more about Desktop bridge and UWP conversion have a look here

Recently Advanced Installer has released a free express edition which is a GUI based tool to simplify the process of converting legacy exe/msi to appx format.They have also stated to support the new MSIX format in their upcoming release.

You can download the free  Advanced Installer express version here.

Pre-Req: Install windows sdk from here 

After downloading install the windows sdk first and then install  the Advanced Installer express edition in a clean virtual machine.After Installing you will be prompted to register using your mail ID to get the free license .After validating click on new and select the Convert Desktop App as shown below and click next.


Provide the setup path (msi/exe) and add any parameters if you wish to add.In this example I have used google chrome msi package to convert to appx format.


Provide the output path or leave to default location.


After clicking Next, the tool will do pre-capture, install the google chrome msi and then do the post capture during the Installation monitoring phase.


Once done, click next. It will list out what all files,registries,scheduled tasks etc..
You can do cleanup in this section and then click import.


Click build icon to create uwp app.If there are any issues, it will show build failed.


You can see that in the below screen it says that the Appx package must be digitally signed to install.


I have ignored this warning and proceeded next.You can see the output files. Inside Google Chrome-BuildUwpAppx folder you can see the Google Chrome.appx file created.


To install the Google Chrome.appx, open elevated powershell window and run the below command.


Add-AppxPackage"Path to .AppX File"

You can see that the command fails stating that there is no valid digital signature.


For testing purpose, I have created a dummy certificate following the steps provided here


After that in the Advanced Installer project, I scrolled to Digital Signature tab and added the above created google.pfx file and selected enable signing option as shown below.


Click build option to add the certificate inside the output .appx file.Once done run the below command to test the output package.

Testing :Open elevated powershell and run the below command.

Add-AppxPackage"Path to .AppX File"

This will install the package successfully.If you are facing issues during Install because of certificates, follow these steps as mentioned here.

From my testing I found the below Pro's using the Advanced Installer express edition.

1. User Friendly GUI which makes even a beginner to convert legacy apps to UWP easily.
2. No need of docker image and desktop bridge powershell commands to convert anymore. We can install the Advanced Installer application in the virtual machine and use it directly to convert.
3. With the same project we can also create msi/exe output files (makes life easy).
4. Highlights the issues found during build phase which really helps us to easily resolve it.

Con's:

1. Install Monitoring Phase takes quite some time which can be made faster.

So why wait, go and grab the free Advanced Installer express edition and convert your legacy apps to UWP easily.
 

Decrypting how Microsoft Teams new MSI works

$
0
0
Microsoft has released a windows Installer MSI for Microsoft Teams for deployment through SCCM.You can download it here


As per Microsoft Statement:


"The Teams MSI will place an installer in Program Files. Whenever a user signs into a new Windows User Profile, the installer will be launched and a copy of Teams application will be installed in that user's appdata folder. If a user already has the Teams app installed in the appdata folder, the MSI installer will skip the process for that user."


NOTE: Don't change the install location as it will break the process.


In this blog, I will explain how this happens by opening MSI using Installshield.


1. To Install Microsoft Teams, it first requires .net 4.5 or later to be installed in the machine. This check happens using Launch condition which also does a system search for .net registry to be present in the machine.


2. The MSI has only one file which is Teams.exe that gets installed to [ProgramFilesFolder]Teams Installer location.


3. It also has only one registry file which gets placed in Run key.So whenever a user logs in, the run key will trigger the command present in it. So in this case it triggers the Teams.exe -checkinstall


So after published through SCCM system context, you can find the Teams.exe installed in the following location.


Also a run key is created in the machine registry HKLM which will trigger the Teams.exe to check for files installed in %localappdata% if not present install the files and launch automatically.


User if logged in, needs to logoff/login again. If a new user logs in then the run key will trigger the install process in the background  and place the files in the below location and then launch automatically.


To perform a clean removal of files through SCCM, use the Powershell script from the below link.


https://docs.microsoft.com/en-us/microsoftteams/scripts/powershell-script-teams-deployment-clean-up

MSIX - The future universal format

Viewing all 144 articles
Browse latest View live